Like some of you, I've been waiting for Rd 2 decisions that should be published in the next 3 weeks. It already feels like the longest 5 weeks of my life (had my last interviews two weeks ago). To kill time, I thought I'd post what I think is one of the most often overlooked aspects of remote video interviews -
Lighting.
Light is one of the most important elements in photography and videography. A good lighting setup can make a big difference in how the subject appears in photos or videos. For example, your forehead may be too shiny if the light is too close to your head; or cameras will compensate for bright lights in the majority of the frame (background) by dimming the overall brightness, causing a darker-than-normal exposure on the most important element of the frame - Your face. Unfortunately the technology in cameras haven't quite caught up with our eyes yet, and thus, in some situations, need to be supported with good lighting setup to make you look more human.
Some of us can't visit campuses for face-to-face interviews, and may be offered interviews via Skype. You need to put your best foot forward, including ensuring that:
- The interviewer can properly see your facial expressions by providing sufficient lighting; and
- There is no distraction in the background.
Unfortunately, webcams aren't known to project a flattering version of the subject. Nevertheless, assuming webcam technology doesn't dramatically improve in the near future, one of the things you can do to present yourself in the best light (pardon the pun) is to have sufficient lighting.
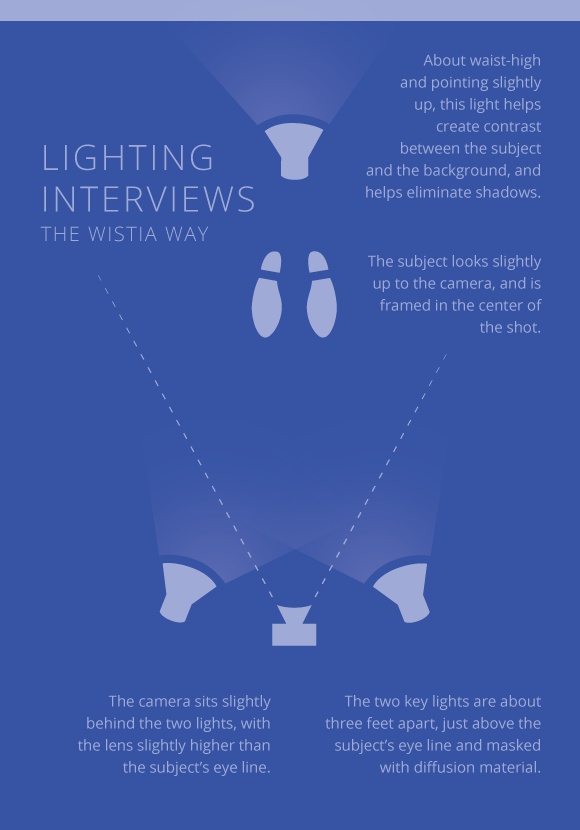
Here is a good lighting setup recommendation that I applied recently in my interviews. I just used regular study lamps with new Daylight bulbs and tracing paper to diffuse the harsh lights. I personally didn't use the back light since I only had 2 lamps. I recommend testing the setup prior to the actual interviews - To do this on Skype (Windows version), go to Tools > Options > Video Settings.
For more info, and
a really good video walking you through the setup (you can see the before and after effect when the host alters the positions of the lights), check out:
https://wistia.com/blog/your-first-lighting-kit/  close
close